There’s nothing quite like a visual when you’re trying to make a point. Images evoke emotion, make text more readable and clarify complex ideas. But there’s another powerful benefit to using images that's easy to overlook - the incredible boost that image SEO (search engine optimization) can lend to your content marketing strategy.
In this post, we'll go over what image SEO is, and how optimizing your visual content can benefit your business. I'll also share some key best practices and tips which you can put to use right away.
What is Image SEO?
Image SEO is the practice of selectively choosing and refining the images on your website to improve the visitor experience, attract inbound links and boost your visibility in search engine results.
Images are important to your website - rich, eye-catching and useful visual content helps to capture and retain the attention of your target audience. Yet images that are too large can slow down your website and images that serve no purpose can be confusing. Properly optimized images keep your site speedy and easy to navigate so that visitors (and the search engines) will have a positive, friction-free experience with your brand.
Like any type of SEO, the key is to please your visitors first, then you can adjust specific elements of your images to clarify their purpose to the search engines.
What Are the Benefits of Image SEO?
Image SEO requires extra effort, but the payoff is worth it. Here are a few ways that optimizing images can work to your advantage.
Images improve the quality of your content
Images break up large blocks of text and help to illustrate points. This enhances your content, making it easier to read, and more satisfying for searchers.
When visitors to your website find what they’re looking for, they’re less likely to hit the back button on their browser. Instead, they'll move deeper into your site to read other content, learn more about you, and to download, bookmark or share your materials. This behavior sends a positive signal to the search engines and improves your ability to rank.
Images attract inbound links
Links are critical for SEO.
- Internal links (links from one page on your website to another page on your website) improve the user experience and help search engines crawl and understand your site.
- Inbound links (links from another website to yours) are essentially a “vote” for your website. They indicate to search engines that other sites approve of your content, which boosts your authority.
- And finally, outbound links (links from your website to other sites) improve the user experience, your relationships with other websites and shows that you’ve done your homework.
Images, especially original images, attract inbound links. Other websites will embed your visuals into their content - ideally, they'll also credit you as the creator by adding a link to your site, but even if they don’t, this can still work to your benefit. Original images usually contain your brand name, so they serve as free advertising. You can also contact sites who haven't included a link and ask them to add one. Most of the time, they'll happily honor the request.
Images rank separately in search engine results
When you attract links to your images, two things can happen. First, the page that contains the image can benefit, and second, the image itself will get a boost, and may begin to rank in Google Images on its own merit.

This can be a big SEO win - according to research conducted by JumpShot and Moz, nearly 27% of search queries take place on Google Images.
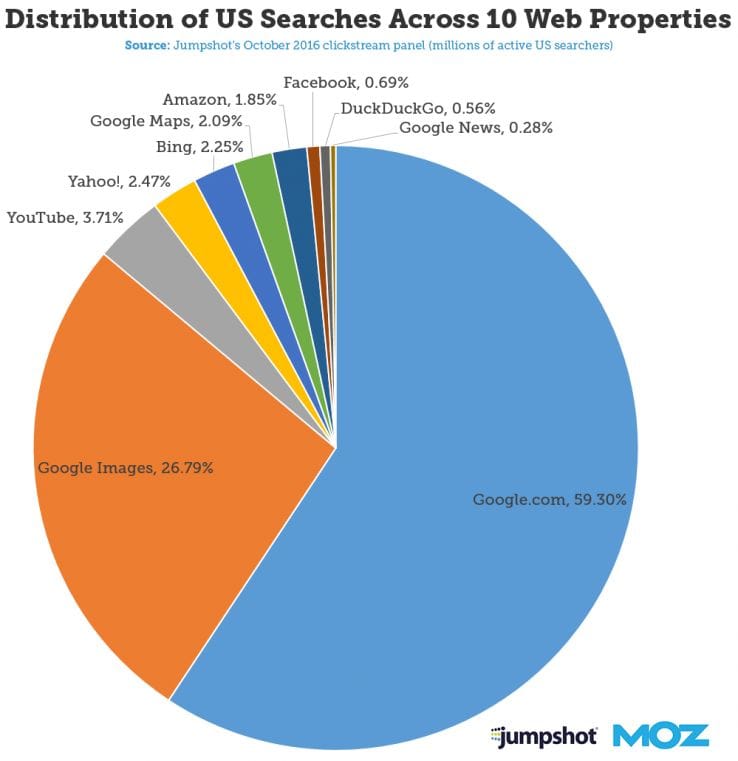
As such, successful image SEO can seriously impact your website traffic.
Images encourage social sharing
Take a look at your feed on any of the social media platforms and you’ll find that most posts contain an image. People like to share visually appealing content, so why not make it easy for them?
When you include images in your content, readers will enjoy it more, and will be more likely to share. This, in turn, will drive traffic to your website, which will attract even more links and improve your ability to rank.
Image SEO Best Practices and Tips
Now that you understand how image SEO can improve the user experience, and boost your visibility, you’re probably wondering how it’s done. But before I get into the details, here's a cheat sheet you can save for easy reference later.
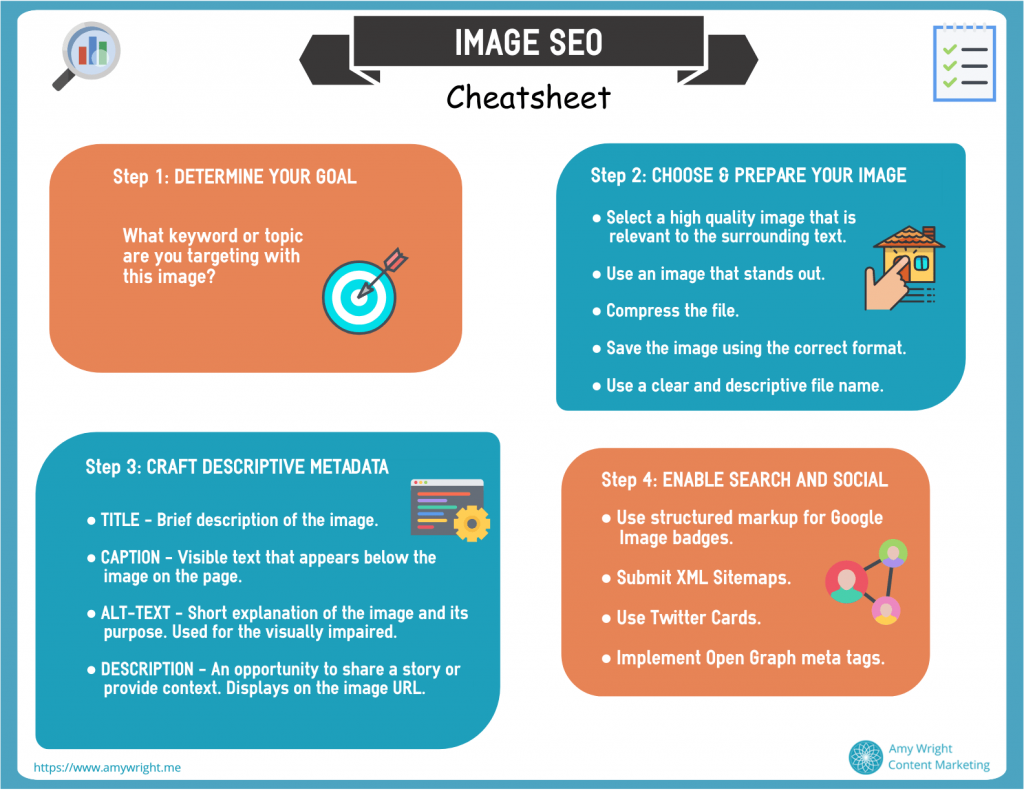
If you'd rather have the PDF version for printing and sharing, you can download it here:
Now let's get started.
Step 1: Determine your goal(s)
Most written content targets a particular keyword or topic. Images are no different. Even if you embed your images in a larger piece of content, each one can have a separate goal.
For example, imagine you’re trying to rank for the phrase “camel humps” (don’t ask) and you researched and wrote a comprehensive blog post on the topic. You could use a variety of images in this post to illustrate each point, and optimize each one to a variation of the phrase “camel humps.”
Every image in your post has the potential to rank on its own. An infographic summarizing key facts about camel humps, for instance, could target the term “camel hump facts infographic.” And that’s great, but since this phrase contains the term “camel hump”, you’re also supporting the overall goal of the page.
Step 2: Choose and prepare images for use
Once you know your goal, you’re ready to choose and prepare your images. Here's a list of items to address before loading an image into your content management system.
Image Relevance and Quality
Choose images that will enhance the reader’s experience. Visuals should be easy to see, and relevant to the surrounding text.
This may sound obvious, but if you’ve ever come across a website with grainy or microscopic visuals, you know exactly what I mean - visitors will judge the quality of your content based on the quality of their visual experience. And the search engines will note their reaction.
Image Size and Clarity
Research your target search term in Google Images and take note of the pictures that stand out. This your competition - what are they doing right, and what can you do differently?
In general, standard sized images with a topically relevant title or eye-catching colors do well.
Compression
Large image files will slow down your page load times. This impacts the user experience, and in turn, the authority of your website. As such, it’s important to compress your images.
You can reduce the size of your images manually using whatever image editing software you prefer, or you can employ the help of a compression tool that has a good reputation for reducing the size of files without sacrificing quality.
If you prefer to use a tool, a plugin (like Smush) is a good option. Especially if you already have large files on your website. Or, you can compress images before uploading them using an online tool (like Optimizilla).
File Type
There are many different file formats to choose from when saving images, but don’t let this confuse you. The JPEG (or JPG) and PNG file formats are best for images that are used online because they strike the right balance between file size and quality.
JPEG is best for photographs or realistic images with complex coloring, while PNG is better for infographics, drawings, text or logos.
File Name
File names are searchable, they become part of the image’s URL and they impact how search engines index your images. So it’s worth getting this right.
Many images have a generic, cryptic name by default (like IMG_3629.jpg). Change it to something simple, yet descriptive. And, if it makes sense, include your target keyword.
Here’s an example of a good filename:
camel-hump-facts-infographic.png
You might notice that I used all lowercase letters - this is to avoid any challenges with case-sensitivity. You’ll also notice that I used hyphens between each of the words.It’s best to use hyphens in your file names instead of spaces or underscores. This is because people and search engines see hyphens in the same way - they treat them as word separators. So using hyphens ensures that your file names are clear.
Spaces, on the other hand, are treated inconsistently and underscores get ignored. If you use an underscore the search engines will see something like this:
Camelhumpfactsinfographic.png
Not ideal.
One final point is that you can omit stop words from your file names. These are short words like “the,” “and” or “at.” Stop words have no impact, and can result in an unnecessarily long file name and URL. If you find it difficult to determine which words are stop words, check out this list of stop words from Yoast.
Step 3: Optimize images for SEO by using descriptive metadata
Search engines use metadata to understand what each image portrays, and to improve the viewing experience for searchers. Customizing the elements below is another prime opportunity for optimization.
But note, you do want to be careful here to avoid unnaturally stuffing your keyword into these elements - that will only get you in trouble. Instead, work your keywords in naturally using common variations. Also, it’s not required that you add information to every single metadata field. The title and alt text are the most important fields. Use the caption and description fields at your discretion.
Title Tag
Some content management systems automatically populate the title tag with your file name - this can result in awkward titles which offer little help to the search engines. Adjust the suggested title to provide a clear description of the image.
Caption
This text will appear below the image on the published page. If you prefer not to include a caption, leave this field blank, however when people scan articles they often read captions, so keep this in mind when making your decision. Likewise, if you're optimizing an image for SEO, this text can provide more context.
Alt Text
The alt text (aka “alt tag”) should describe the image and its purpose on the page. For example, we could use “Downloadable camel hump facts infographic.” as the alt text for our camel hump facts infographic.
Software programs for the blind or visually impaired use this information to explain what is on the page. This data is also used if the browser has trouble loading the image. When this occurs the browser shows the text instead of the image. Finally, search engines use this data to understand what each image is and why it exists.
Description
Images are stored on your site as attachment pages, and are assigned a unique URL. Description metadata is an opportunity to add additional, interesting information about your image for anyone who finds or clicks through to this page.
Descriptions can be nice if there’s a story behind your image that provides context for your readers. And, of course, it’s a chance to provide the search engines with extra information.
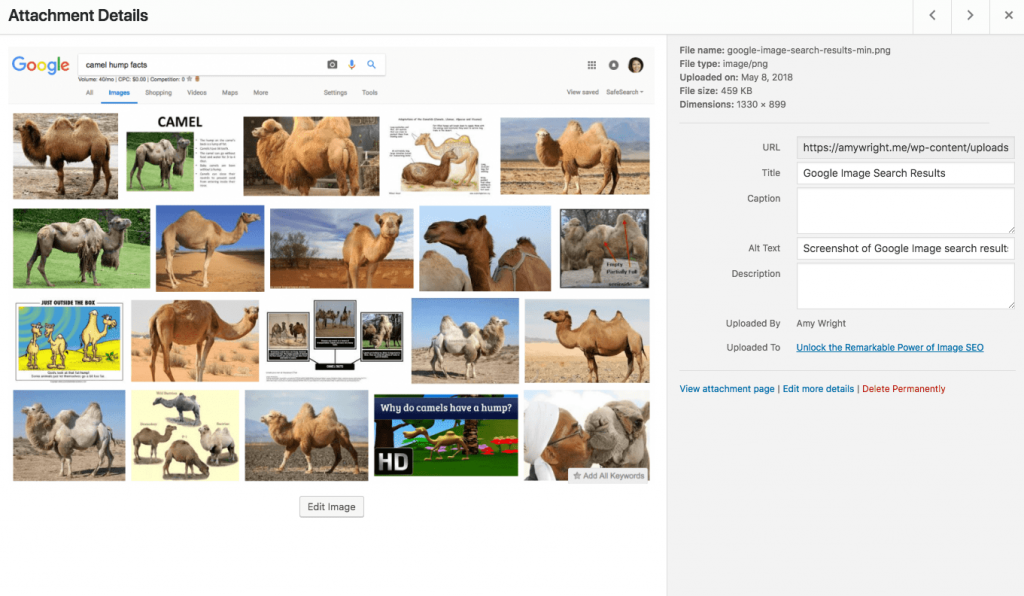
You can adjust the above elements from within your content management system - in Wordpress, it looks like this:
Step 4: Enabling Search and Social
If you really want to give your images their best chance of success, there are a few other things you can do.
Structured Markup for Badges
Google Images supports “badges” for certain types of images (like those that lead to recipes, products or videos).
A badge is informative text that appears in the bottom left corner of the image thumbnail in Image Search - badges provide insight into the content behind the image, and if it matches the searcher’s intent, it may encourage them to click.
Information about the badge feature and links to instructions for adding the code to your site is available directly from Google.
XML Sitemaps
An XML sitemap is a file (or set of files) which provides search engines with information about the important pages on your website - including the images. You can submit your XML sitemap to Google Search Console (and other search engines) so changes to your site are indexed quickly.
If configured properly, some content management systems will generate (and update) sitemaps automatically. Check your settings to confirm that your XML sitemap includes your images, and has been submitted to Google.
Twitter Cards
Whether you’re active on Twitter or not, people will share your content through this platform - but you may have noticed that some tweets contain big beautiful images, while others do not. You can control how your content appears by enabling Twitter cards.
Twitter cards are free and easy to implement (by adding a little code to your site). Twitter provides a guide to optimizing tweets with cards to make this simple.
Open Graph Meta Tags
Similar to Twitter Cards, Open Graph is code you can add to your website so that your content (and images) will appear properly on social media. Twitter also uses Open Graph, but cards provide more control.
If you don’t like the way your content appears on Facebook or LinkedIn, it might be because you don’t have Open Graph implemented on your site. The way to fix this will depend on your content management system, and whether or not you have access to your code. If you want to handle this yourself, this article on open graph meta tags can help you get started.
When you finish optimizing your images, and are ready to publish, take a moment to preview your content. I’m embarrassed to say that I've missed this step myself and regretted it later.
Check the appearance of your images to make sure they are properly sized and aligned, and look at them on larger and smaller devices to see how they respond on different types of screens.
The Bottom Line
Image SEO is a great way to maximize the impact of your content, and improve your visibility in search. Properly optimized visual content improves the searcher’s experience, attracts links and will encourage social shares.
With a little extra effort, your images can also rank, independent of other content, and further increase exposure for your brand.